Posts Tagged ‘VW themed craft’

Phew! It’s been a scorcher of a week – cloudless blue skies and a blazing sun from first thing in the morning until last thing at night. Lovely!

In truth, it’s been way too hot to stay inside for the last few days so my crafting adventures have been a bit thin on the ground this week; Instead I’ve ditched assorted projects in favour of the odd spot of sunbathing and lots of gardening…. Quite a welcome change really.

Here’s the only bit of sewing I’ve done this week – I think it may possibly fall more within the realms of embroidery though…..
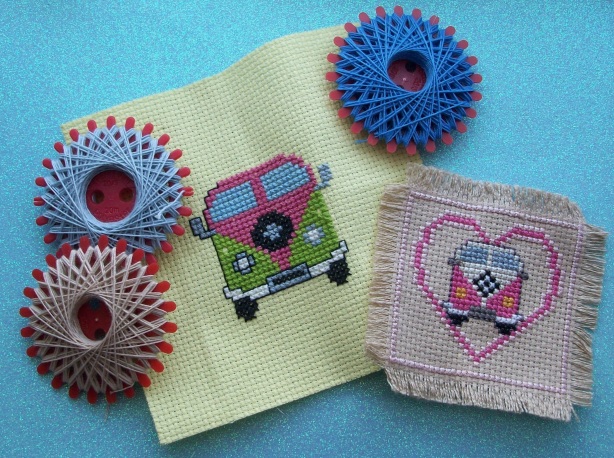
A pair of cross stitched VW splitties – not quite finished yet but both destined to embellish different sewing projects.

Both these pieces of cross stitch are destined for separate projects I’m working on. The smallest one is going to be used to embellish a scented heart shaped sachet that I’m going to hang in the wardrobe of my camper van and the larger piece is going to be incorporated into a much needed needle case for any sewing on the go that I may need to work on.

They’re both my own designs…… and without wanting to sound like a right royal misery guts, I don’t really want to share them with anyone. They’re also ACID protected; For more info click here.

If you are interested in a bit of VW themed stitching there’s a couple of free VW themed charts that you could use here.

And I’ll share one of my designs with you too….. Suitably patriotic to help you celebrate forthcoming events in the UK throughout the Summer.

I wonder how many people actually do make a point of acknowledging the original designer when they make use of their free ideas?

Maybe it’s a bit late in the day to be setting to work to make a cross stitched Union Jack heart – what with the Queen’s Jubilee celebrations set to take place in only a few days time. However, it’s an easy chart to follow as it only uses whole cross stitches and a simple backstitch to outline the shape – easy enough for even a complete beginner to have a go at!

Please feel free to use this motif in your own work but remember to acknowledge the original designer when displaying or selling your finished work 🙂

Here’s the chart to make the job a bit easier…..

This motif can be produced quickly and easily; It is suitable for complete beginners as it uses only whole cross stitches and simple backstitching to add definition to the outline.

The sun’s STILL shining; Time for me to back out into the garden and water the plants. But before I sign off please note that next week see’s the crossover into another month and the new theme of ‘Dyeing’. I’ve got my rubber gloves at the ready and can hardly wait! Until then, Happy Crafting 😉

A very quick post this week again I’m afraid……….

This month’s theme is sewing; my machine has gone into overdrive recently with assorted strings of bunting, cushions, bags, patchwork etc flying out at a rate of knots. It’s been manic!

Here’s a few of my favourite makes of the moment…….

Felt Union Jack Cushion

Floral Micro Bunting – Perfect for decorating your favourite ride….

Patchwork Bags – Tanglewood Style

I love this! It’s called the ‘Tanglewood’ bag and the pattern and full making up instructions are available to purchase from here – http://rosylittlethings.com/tanglewoodpattern.html

‘It’s a little bit hippie, a little bit preppy. It’s a little bit country and a little bit Liberty. It’s embroidered yokes and dangly earrings. It’s blackberry crumble, balmy nights, and piccolo solos. It’s picnic quilts spread out, corner-to-corner on the concert lawn. Bring on starlight: You’ve got the perfect bag for it now, honeygirl.’  Alicia Paulson – Posie, Rosy Little Things Blog.

Machine patchwork – Cool!

Tanglewood Bag Detail

Phew! I said it’d be a quick post didn’t I? It’s back to the sewing machine for me I’m afraid – no rest for the wicked! I’m destined to end up like this young man if I’m not careful….. I certainly know the feeling!

Banksy’s ‘comment’ on the use of child sweatshop labour currently being exploited in the name of the Golden Jubilee and Olympic celebrations – something a lot of us handmade in the UK crowd have been pointing out for the last few months……

It’s the third week of my challenge and this time it’s all about origami.

Skull & Crossbones by Quentin Origami

Deriving from the words ‘ori’, meaning ‘folding’, and ‘kami’ meaning ‘paper’, origami originated at some time during the seventeenth century in Japan. It’s the art of transforming a flat sheet of paper into a three dimensional art form by the use of various folding and sculpting techniques – no glueing or cutting is involved; That would be ‘kirigami’. Then, of course, there’s ‘kokigami’ which I suppose is best described as ‘packaging’ – but more of that later… 😉

Paper Cranes – A Symbol of Peace

In truth, I’m no stranger to the gentle art of paper folding – In the past I’ve folded many a crane in the name of Peace and taught countless classes of Primary school children how to turn a paper square into something amazing. But you don’t really need me to show you how to do this in person as there’s oodles of fantastic websites, books, video tutorials etc out there that’ll take you through everything step-by-step.

This site’s great – video tutorials, lots to make and you can even print your own paper!

http://en.origami-club.com/

Anyway… I chose to have a go at some VW themed origami for this week’s challenge (of course!!!!!) , based on the classic Charles Esseltine VW Beetle design:

Origami VW Beetle Design by Charles Esseltine

Really, it’s not for beginners at all, so if you want to try this one out I’d definitely have a go at getting the more basic stuff under your belt first – There’s a rather lengthy tutorial on YouTube that you can have a go at following if you desperately feel you need to have a go – it’s in two parts so you’ll have to make sure you view both bits):

http://www.youtube.com/watch?v=Mu4mXNNXzWA

The fruits of my labour – a bit rusty as I haven’t indulged in a few years…

Pink VW Beetle by Big Blue Bully Bus

A tad tricky when an over enthusiastic bull terrier wants to help! 🙂

And Kokigami… I said I’d get back to it didn’t I?

First of all – it really does EXIST!!!!! It’s not a spoof. It would probably be wisest to do a Google search on this – or look it up in the Urban Dictionary. I can’t fully explain it without blushing!

Basically (and this is the story I would tell my Mother), many moons ago (the early nineties to be precise), I bought a lovely little book about this particular art form that had the most amazing pre-printed templates and easy to follow instructions, advice on taking accurate measurements and even scripts for role play etc. I believe that even now it’s long since gone out of print, that it’s still available to buy from the likes of Amazon; A tome I’d heartily recommend for your craft reference shelf if nothing else…..

All I can say is…….  if you found any of my links at all useful, and you’ve had a little go at a few folds etc……… and you’ve got access to a little bit of PVA glue, some scissors and a tape measure…… you’ll possibly LOVE this little book and it’s amazing projects; I’ll say no more 😉

The Kokigami Horse – Stuff of Nightmares?

Well maybe a little bit……

The best online reference I can find to the art itself and the particular book in question is here (it’s in Spanish but there’s an optional button to translate – hilarious in itself):

http://www.blogodisea.com/2011/que-es-el-kokigami/preguntas-respuestas/

Have fun! Speak to you next week about something much more sedate, Debby xxx 🙂

OK. It’s week one of my take on the ’52 crafts in 52 weeks’ project and I’ve chosen to start with something I’m fairly familiar with; albeit a bit rusty at the moment.

This month’s theme is of course ‘Paper’, so I’m setting the ball rolling with a spot of decoupage. For those of you who may never have heard of this before, it’s basically centred around the creative art of cutting out, assembling, pasting and (sometimes) varnishing paper to make decorative objects. With it, you can give furniture a new boost of life, create fabulous greetings cards, 3D pictures etc and generally make all sorts of wonderful stuff for your home .

Fantastic results can be obtained fairly easily and it’s also a great activity to carry out with children when the weather’s vile outside and they’re climbing the walls inside 😉

Here’s a few examples of it in it’s simplest form, but you can make it as complex as you wish.

Bangles courtesy of Becky Decoupage 

Mickey Mouse Side Table by Bombus

In the past, when I’ve had a go at decoupage, I’ve tended to use it to make 3D pictures and greetings cards. This involves using multiple repeat images to build up layers which are then stuck one on top of the other. In each layer, you focus on different elements of the image and cut them out to build up the final piece – Silicone glue, or foam sticky pads also help to give depth to the image and this really helps to make it ‘pop out’ from the page once everything is stuck in place.

Sound difficult? Opt for a technique such as pyramage and it’s simplicity itself!

Here I’ve cut a series of graded rectangular pieces from repeat images of a gorgeous flower powered bug and used sticky pads to hold everything in place and give a raised pyramid effect.

Flower Power Beetle by Big Blue Bully Bus

And here, I’ve used graded squares which gently twist round to create a slightly different effect.

Twisted Pyramage VW Beetle by Big Blue Bully Bus

Here’s an example of a more traditional piece of decoupage that I’ve just created – you can buy ready printed, pre-cut sheets if you want but I prefer to make my own. Only thing is I still need to find time to cut the pieces out and stick it all together!

Email me at bigbluebullybus@yahoo.co.uk and I’ll mail the full PDF to you if you’d like to have a go at making it too 😉

VW Bug PDF by The Big Blue Bully Bus

Phew! Blog post and first craft nearly over – just another 51 to go!!!!

Finally, here’s a little list of things that I’ve copied from Wikipedia that you might find useful if you want to have a go at decoupage for yourself:

  • Something to decoupage onto. Examples include: furniturephotograph albums, plates, ceramics, shelving, frames, mirrors.
  • Pictures to decoupage with. These can come from myriad sources: newspapersmagazinescatalogues, books, printed clip art, wrapping paper, greeting cardsfabrictissue paperlace.
  • Cutting utensil. Scissors, craft knife (X-Acto) or razor blades can be used.
  • Glue. Standard white glue works best if it is diluted with a little water. Specialty glues can be found in most crafting stores.
  • Smoother. Popsicle sticks work well. A brayer is a specialized tool like a miniature rolling pin designed to help remove wrinkles, remove excess glue and smooth pictures.
  • Glue spreader. Many things around the house can be use for this: cotton swabspaint brushes, sponges.
  • Rags, sponges, tissue paper to help wipe up glue and other clean up.
  • Sealer. Glue or other decoupage medium can be used as a sealer. Alternatively, polyurethane, spray acrylic or other lacquers are usually used.

Why not have a go yourself? It’s fairly inexpensive and great fun!