Archive for February, 2012

Can you believe just how quickly time flies? It’s more than a bit scary when you consider that I’m already on to my eighth adventure in my 52 week crafting challenge…… Before you know it I’ll be waxing lyrical about some VW themed Christmas creation that incorporates glitz, glam and glitter in a pink colourway – And that prediction would be sad if it wasn’t possibly all too true where I’m concerned! But them’s the breaks!

Let’s draw breath for a moment. This month has been all about jewellery; And you can’t really cover every aspect of this humoungous theme in the month of February – this much even I know!

So for the last four weeks I’ve chosen to focus on different projects that incorporate beads – because beads are my kind of thing; I just love all things beaded! Nearly as much as I love Bull Terriers or VW’s.

It’s for this reason that I have to share this non-jewellery related masterpiece with you before I tell you about this week’s adventure; apologies if you’ve spotted it already…. I saw it for the first time just after Christmas. I’m amazed at myself that I didn’t blab about it straight away………. but I’ve secretly enjoyed the steadily increasing numbers of piccies that have been released over the last few weeks on the internet.

You know what I’m going to say………. Don’t you?

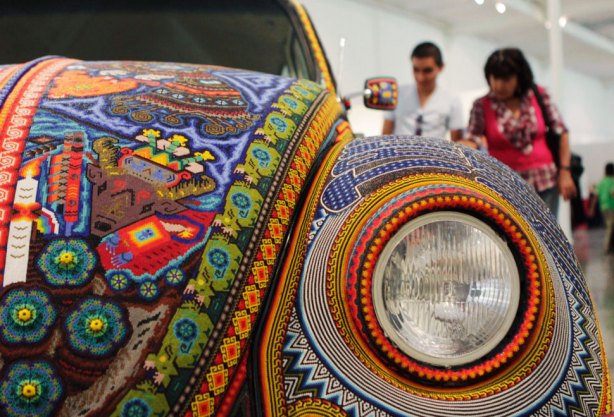
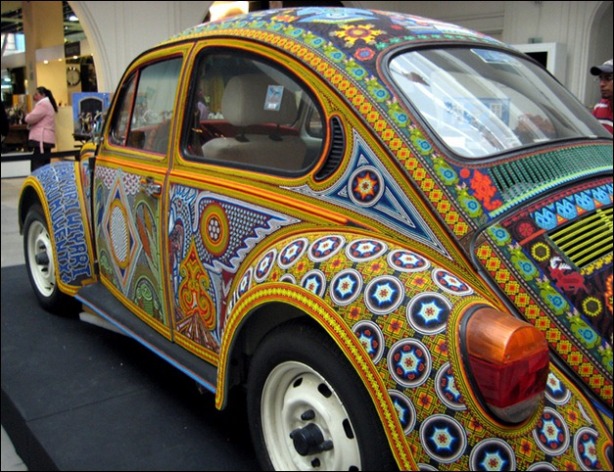
This is the most amazing thing I’ve seen in a long while; It’s absolutely, gob smackingly, stunning ………… and even if it wasn’t a VW Beetle I would still have to bow down very low and acknowledge the incredible beauty, design quality, outstanding crafmanship and sheer technical accuracy and mathematical attention to detail needed to produce this work of art. It’s totally blown me away!

Vochol – Bead Decorated VW Beetle

‘Vochol’  appeared in the Museum of  Puebla, near Mexico City, in August 2011. The name “Vochol”, was conceived from a combination of “Vocho,” a popular term for Volkswagen Beetles in Mexico, and “Huichol”, a Mexican indigenous group. The car was decorated by craftsmen from the Huichol community living in the states of Nayarit and Jalisco, using traditional beads and fabric. It’s possibly going to be auctioned off some time this year with all proceeds going to the Huichols – All I can say is that I need to win the Lottery; PRONTO!

I can’t get my head around the amount of hours needed to complete this labour of love!

Bagsy let me be the bloke that sets the last of the 2,277,000 tiny glass beads in place … ;0)

It’s just beautiful!

The bug spreads it’s wings and get’s ready to fly……

Are you drooling yet? I am!

In excess of  2,277,000 tiny glass beads have carefully been set in place by hand to complete this awesome beast. Can you imagine doing this? I can’t!

So, with all that to digest I also bring you this week’s offering from me – my adventures with tiny glass beads using an Indian bead loom. Something tells me that whatever I do it won’t be one iota bit as impressive as what you’ve just seen; I’ll crack on any way 😉

Now although bead looming may seem a little daunting at first it’s actually a surprisingly simple process, as once you’ve got the hang  of how to string up the loom itself, pretty much the same technique is used to make anything.

As with most things, there are plenty of tutorials to follow on the internet, and, as is usually the case, they vary in quality and helpfulness. For a change, this week I thought I’d focus on passing on a few helpful tips rather than directing you to assorted websites and videos on YouTube – You can do that bit for yourself I’m sure 😉

Top Tips for working with a bead loom:

Remove any pets from your work area! I have two English Bull Terriers that always seen to want to ‘help’; experience has proven them to be tad bungling in the jewellery making department;

Use shallow dishes to put your beads in – saucers are perfect for organising your rocailles (seed beads);

Make sure you use sharp scissors – blunt ones will fray your thread;

When setting up your loom make sure that you cut the threads at least 30cms longer than the intended length of your finished design and always cut one more loom thread than the number of beads in the row;

Slightly wetting your thread will straighten it and help it to sit easily between the separator coils;

Once beading is underway remember to angle your needle slightly upwards – this helps to prevent accidentally sewing in to the loom threads;

Invest in more than one bead loom! If you’re anything like me you’ll probably end up with more than one project on the go at any one time (I’ve got four looms in total – each of them very much in constant use).

I love this bead loom with it’s little recesses for organising your rocailles.

So, what did I make this week?

A quick and simple beaded wrist band by The Big Blue Bully Bus

Then I started a nice rainbow themed bracelet …

And on to the next design…

And finally…… here’s a little freebie I’ve designed for you – it’s intended to be used for a brooch  but you could quite easily repeat it a few times and make yourself a nice little patriotic cuff. But please don’t forget to acknowledge the designer should you decide to use it…

Please acknowledge the source of this design if using it in any of your work 🙂

Next week sees the start of a new theme with ‘Retro Crafts’; And I’ll be showing you some cool little gizmos that’ll make your crafting life a whole lot easier. Until then, Happy Crafting!

The world and his wife seem to be going crazy for Shamballa bracelets; I kind of don’t get it. But, I do get loads of people asking me if I can make them, to which the answer is usually……, NO!

Shamballa Bracelet by naturalhandmadejewellery.com

This week, due to the high number of requests that seemingly will not cease, and the fact that it’s coming up to festival season where they’ll probably fit in quite nicely with everything else I stock on the trade stand, I have finally decided to bow to the pressure and make macrame bead bracelets the subject of my crafting adventures.

First, to understand why people are going crazy for them….

Shops don't sell bracelets; Rapper's do!

Shamballa is apparently some hidden kingdom that’s been mentioned in lots of ancient Buddhist texts; It’s a place of peace, tranquility and happiness. Shamballa is also one of the bodie’s chakras and is located in the heart of all living beings. Apparently, the current craze for Shamballa bracelets and necklaces was brought about by the fact that assorted rap and hip hop artists have taken to wearing them because of their deep and hidden meanings and healing properties. This, in turn, has resulted in assorted celebrity names also jumping on the bandwagon; The likes of Jay Z & Beyonce, Michael Jordan and Heidi Klum have all been spotted sporting their Shamballa goodies and their fans have followed the ‘trend’. It’s pretty much like going back to the eighties with the Beastie Boys and everyone stealing VW badges all over again! Now that I can understand……… 😉

Shamballa - The symbol of peace, tranquility and happiness - Gulp! ;0)

Here’s a great tutorial that shows you how to make a macrame bead bracelet for yourself:

http://www.shamballas.com/how-to-make-a-shamballa-bracelet/54

Half way there - About 15 mins work.

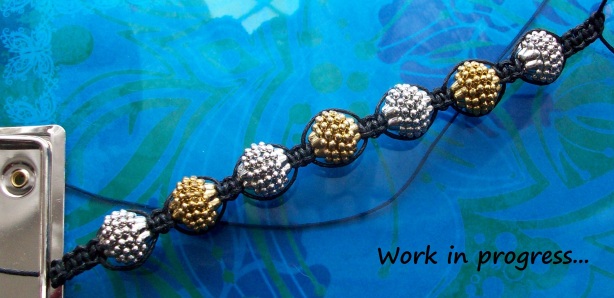
And here’s mine using waxed cord and metallic effect berry beads.

Macrame Berry Bead Bracelet by The Big Blue Bully Bus

Dead easy to make and very quick to complete! Why not have a go for yourself and join in with the crafting fun?

Next week sees the final part of my adventures in jewellery making – with me getting all excited by Indian bead loom bracelets and beyond. Until then, Happy crafting!

Quite a few of my jewellery designs feature Fimo beads.

I’ve been making jewellery since I was at high school; To be fair that’s quite a while!

Quite a few of my designs feature millefiori Fimo beads, so this week I set myself a challenge of having a go at making some of my own. Here’s what I got up to in my adventures…….

…… But first we’ll do the explanation bit!

Millefiori is a term that’s more traditionally used to describe a particular technique used in glassmaking. It’s derived from the Italian words ‘mille’ (thousand) and ‘fiori’ (flowers) and it’s a brilliant way of adding decoration and colour. Glass millefiori beads are absolutely stunning – I use a lot of those too.

Millefiori Glass Beads available to purchase from beautifulstuff.com

To make polymer clay (Fimo) millefiori beads you first need something referred to as a ‘cane’. Now as I’m an ex teacher I suspected that all of this ‘cane’ business was going to be fairly easy. But I didn’t think to factor in that I had decided to try this challenge out on the day that I celebrated my 21st birthday (Yes, AGAIN !!!!!) and was already slightly the worse for wear after starting celebrations a tad too early. I tried my best regardless……

Making a cane seems to use pretty much the same technique as putting letters in sticks of rock; Possibly a strange comparison to make, but I’m from Lytham, a stone’s throw away from a rather famous Lancashire seaside resort where I was born in the Royal Victoria Hospital (21 years ago, like I said), and as about 99.9% of all the sticks of rock sold all over the UK are actually made in the aforesaid town with a tower, I figured that surely there must be something in the blood that would deem me a natural with such things.

I found a video tutorial to aid me in my quest; It’s brilliant!

http://www.youtube.com/watch?v=Qj9Snv3OXRE

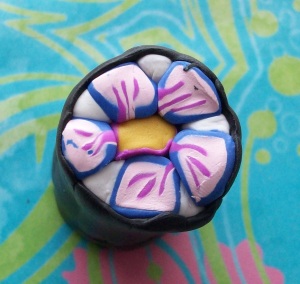
Here’s the one that I made:

My first attempt at a flower cane - all ready to roll out.

Take a good look at it because disaster struck shortly afterwards……. I think possibly because I took a while to find my camera……… and then stopped for a short wine and snacks interlude…….. the fimo wasn’t as pliable as it had been when I first started working it. So as I returned to the task and began to roll the cane out it started to crumble and broke open. I pieced it back together as best I could but it’s not as flowerlike as it should be 😦

Luckily I’m an optimistic soul. Nothing’s a disaster; It’s never a mistake – just a design element I might not have planned. I’ve learned that you can’t walk away from something that’s only half done if you’re using Fimo – next time I’ll do better 😉

So, I carried on until I’d made my beads – I’m so glad I did. I’ve still got to bake them in the oven and then incorporate them into a finished piece of jewellery. You haven’t seen the last of them though; Watch this space…………!

My very first millefiori beads - I'm delighted with them!

Now where’s that glass of wine and bowl of nibbles? – There’s some celebrating to be done :0)

Wow! It’s already February and this week see’s the move into the second month’s theme of  ‘Jewellery’. And a very busy start to the month at Bully Bus HQ it has been what with early Spring cleaning and all; I was fearful that at one point I might not be able to squeeze this week’s offering in at all, but here it is – my adventures in beaded felt jewellery….

I love playing with embroidery silks and beads!

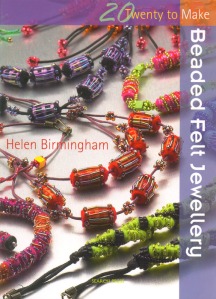
First of all, I have to say that I LOVE making little felt beads! The resulting treasures look great when incorporated into jewellery designs and are always a really big talking point when people spot me wearing them. They’re incredibly easy to make and there’s also a brilliant little book bursting with all the inspiration and instructions you’ll need to get producing them for yourself.

Beaded Felt Jewellery – Helen Birmingham

If  you haven’t got a copy of this inexpensive little book, and you feel after reading this blog that you’d like to include beaded felt jewellery in your own crafting repetoire, I would highly recommend popping along to your local bookshop, craft store or online at Amazon and make sure that you pick one up – ISBN-13: 978-1844483150.

Make sure you gather everything you need!

So…….. How to make some felt beads of your own. Hopefully you’ve gathered together some scraps of felt (the thin crafting type is easier to work with), some embroidery silks (although normal sewing thread is fine), a selection of seed and bugle beads, a sewing needle, some scissors and a bamboo skewer – make sure that you either cut the sharp end off, or cover it with a blob of  Blutack or piece of cork though; From painful experience I can’t tell you the number of times I’ve impaled myself with the air turning blue as a result 😉

Step 1: Cut yourself some strips of felt roughly 2.5 cms wide by about 8 cms long. Select some thread to match the colour of your felt – it doesn’t matter too much if it’s not exact.

Step 2: Take the bamboo skewer and wrap the felt strip tightly around it. Use a few stitches to secure the edges in place. I’ve used a contrasting colour to demonstrate – And don’t worry about being too precious at this stage as you won’t actually see this join when you’ve finished.

Wrap tightly then stitch to secure.

Step 3: This is where the fun begins! Choose some contrasting thread and using your needle, sew into the felt tube at one end to secure in place. Carefully wrap around the tube with the thread, making sure that both ends are tightly bound – otherwise the ends will flare out over time and the beads may look mis-shapen. Finish off with a little knot and bury this, along with the tail of you thread, inside the bead.

Bind well at each end to stop ‘flaring’.

Step 4: Securing fresh thread in your felt tube bead (back to the same colour you used in Step 1) you can now add your embellishments. I tend to start at one end and work randomly, stitching through from one side to the other each time to secure your seed or bugle beads in place. This will add strength to the structure of your bead and ensures maximum life expectancy when incorporated into jewellery pieces that are sure to be worn again, and again, and again….

To make life easy I’ve used size 8/0 beads; Size 11/0 will require more patience as not all will slip over the eye of the needle!

I like to add the beads in a random pattern – but neat freaks may differ in approach 😉

Step 5: Believe it or not that’s pretty much it! Repeat each step until you’ve got yourself a nice little selection of beads which you can then use in your own jewellery making projects. I tend to keep the beads on the skewer until I’m ready to use them and you’ll find that you can easily fit about six or seven beads to a skewer – just the right number to use for a bracelet!

So easy! And gorgeous when incorporated into your own designs 🙂

Yay! The finished product; Very nice – even if I do say so myself 😉

Next week I’m going to be having a go at more bead making – but this time with Polymer Clay. Wish me luck!