Posts Tagged ‘free pattern’

Whilst my wrist and the dreaded carpal tunnel syndrome continues to be a bit of a problem I’m determined to not let it interfere any longer in my ’52 crafts in 52 weeks’ odyssey. I think a rough tally has revealed that I’m about 7 weeks and nearly two themes behind at the moment; Not good, but I’m sure I will catch up eventually……..

So – a little project tutorial to get me back on track this week which addresses the August theme of ‘Fibre’. Have you got your knitting needles at the ready? Let’s begin……

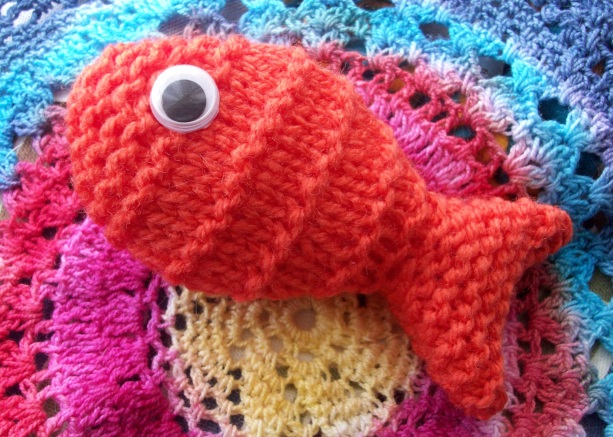
Instructions for making a simple version of my knitted fairground fish – Hurrah!

For this project you’ll need a pair of 4mm needles, some DK weight yarn, a pair of safety google eyes, BS standard toy stuffing and a large darning needle.

Start by casting on 15 stitches and knitting 4 rows of garter stitch (every row is a knit row).

Continuing in garter stitch, decrease at each end of the next and every alternate row until you are left with a total of 7 stitches.

Purl 7 stitches in the next row – from this point we will be continuing in stocking stitch for the main body of the fish (so it’s knit a line, purl a line from here).

Increase at each end of the next, and every alternate row, until you have 15 stitches.

Continue in stocking stitch without any further shaping for the next 9 rows.

Now we’re going to go back to garter stitch – so we’ll be knitting every row from here. Decrease at each end of this, and every alternate row until you have three stitches.

To finish, knit these three stitches together and fasten off. Repeat the whole process again for a second fish shape.

When both pieces are complete, position the safety eyes, sew together inside out, leaving the tail end open ready for turning and stuffing.

Turn the right way round – remember, it can be a bit of a squeeze at the tail as it’s only 7 stitches wide! Stuff lightly – the blunt end of the knitting needle is a great aid in helping to complete this task. Oversew the ends of the tail together and tie off, weaving in any loose ends.

I like to add a little bit of fishing line to the central back of my fish and display them suspended in little plastic bags – just like fairground fish. Ultra cute and very quick and easy to make!

Please feel free to use this tutorial to make your own fairground fish but remember to acknowledge the designer should you choose to do so. My fairground fish design is ACID protected with detailed paperwork and images to support each stage of production – so to avoid legal action please do not attempt to sell the pattern or design as your own 😉

There’s something very soothing and lovely about a nice cup of tea; Particularly one that’s made using a teapot and some proper loose leaf as opposed to a couple of teabags.

A good cup of Rosey Lee is one of my vices, and whether I’m at home or on the road, a teapot is an absolute necessity; That, and an accompanying cozy of course – as it helps to keep the pot warm and prolongs the whole tea guzzling experience just that little bit longer 😉

I spotted this rather lovely example on the telly the other week……

How marvellous!

………And tracked it down as available to purchase from Debenhams; It looked like a must-have buy……….

However, on closer inspection I found that it’s part of a larger range of patriotic themed wares that go by the name of ‘Street Party’ and has been made to fit one particular teapot that’s shaped differently to mine. The label also reveals that it’s been made in China and imported in to the country – therefore not really flying the British flag and supporting the UK economy 😦 It was with a heavy heart that I kept my money in my pocket and walked away empty handed.

Never fear, thought I………I’ll make my own version – based on classic English design and using locally produced materials that boast bonafide British credentials.

So I dug out an old crafting pamphlet that had been produced in the seventies by a local company just up the road from me called ‘Robin’s’ (based in Guiseley, Leeds) and also selected a few balls of DK weight acrylic yarn made by Woolcraft (spun by Yorkshire craftsmen based over the valley in nearby Bradford). Game on!

21 classic knitting and crochet patterns using odd ounces of wool

The pattern I chose produces a fairly easy and quick to make piece of crochet – it’s pictured at the bottom of the front cover in a striped pink colourway with four matching egg cozies. I adapted it slightly to suit my own tension and also to fit my teapot properly; And I made further changes by choosing to continue the striped pattern from beginning to end, using just double crochet stitches throughout as opposed to a mix of double and half double stitches as indicated in the original pattern.

Quick to make and an easy to follow pattern using single crochet stitches.

The adapted pattern is as follows:
STRIPED TEA COZY
Materials:
3 balls double knitting yarn in Red, White & Blue
3.75 mm crochet hook
Make two pieces:
With 3.75mm hook and Blue make 37 ch. Work 1 dc into 2nd ch from hook, 1 dc into each ch to end, turn with 1 ch.
Work in dc to end, turn, break the Blue and join in White, 1 ch then work in dc to end, turn with 1 ch.
Work in dc to end. Turn, break White join in Red, 1 ch then work in dc to end, turn with 1 ch.
Work in dc to end, turn, break Red and join Blue, 1 ch then work in dc to end, turn with 1 ch.
Continue with striped pattern to 5 ins from beg.
Next row, working in dc, and continuing with striped pattern, dec 7 sts evenly over the next and each of the following 3 alternate rows.
Work 1 row. Take 2tog to end of row, fasten off.
Join both pieces together leaving openings for the handle and spout.
Press lightly on wrong side using a warm iron over a damp cloth.
PLEASE NOTE that permission has been granted to share this pattern and no copyright has been breached.

A BBBB design originally intended for use with a bead loom but also works well for cross stitch.

For a special finishing touch I used the Union Jack chart I published in ‘Adventures with an Indian Bead Loom‘ to create a small piece of cross stitch that I layered up with a few squares of felt and then hand stitched in place with a double edge of clear seed beads. And it’s all finished off with a coordinating pom pom (please see last week’s blog for instructions on how to make one).
I think it looks lovely! And a perfect fit for my teapot; a fine example of retro kitsch.
Must be time for a well deserved cuppa now…………
Next week sees my final delve into retro crafts before entering a new theme and a new month – time for a look at one more gadget methinks. Until then, Happy Crafting!