Posts Tagged ‘the big blue bully bus’

Biff – Bully of the Bus – All dressed up to celebrate May 4th in his very own ‘Yoda’ costume!

It’s Star Wars Day! It’s also the start of another month and a new theme of ‘Sewing’.

Just a fairly quick blog post this week I’m afraid……… With a quick idea for a keyring/bag charm with a nice floral theme ……..

The Bully Bus Keyring – With the usual over the top beading and extra floral details!

So, armed with a few bits and pieces and my trusty Sizzix machine, here’s how to make that quick keyring/bag charm……

You’ll need something sharp to cut the thread with too – a light sabre might be a suitable weapon of choice today 😉

You will need:

Pieces of wool felt in two contrasting colours to make a couple of diecut flowers and centre circles – I’ve used the standard Sizzix ‘Large Daisies’ and ‘Circles’ dies to make mine;

Embroidery silk – two strands used together seems to work best for me but I’ve used three for clarity in the photographs;

A sewing needle;

Coordinating ribbon;

Keyring finding.

Firstly, start by sewing your centre circle in to place – I prefer to use a blanket stitch for this but you could try experimenting with either running stitches, back stitches, chain or whip stitching. It’s kind of up to you and your personal preference or level of sewing expertise really. Whatever you decide upon, you’ll need to repeat it once more for the second flower too.

Use a simple blanket stitch to attach the flower centres.

Here’s a quick link to an easy tutorial on YouTube if you’re unsure about blanket stitch – a quick search will reveal similar tutorials for the other methods I’ve mentioned too: http://www.youtube.com/watch?v=eXkSE2TTF4s

Next, take a short length of ribbon – about 15 cms is fine. Thread through the base of you keyring finding, fold in half and secure with a few stitches.

Make a couple of quick stitches to secure the ribbon…… before sandwiching in between the two flower pieces.

Place your ribbon in between the two, back to back, flower pieces and sew together using your desired method of stitching. Top Tip: If you find that your embroidery floss starts to tangle or knot, rub your thumb and forefinger up and down either side of your nose a few times and then slide them down the thread once or twice – it’s an old wives trick that’s guaranteed to work wonders but possibly not advisable if you’re wearing copious amounts of make-up!

Finish by making a little knot and then ‘burying’ the end of your thread in between the layers of felt.

Join the two sandwiched flower pieces together using a blanket stitch.

Voila! A finished item that’s been hand sewn by your very good self; How easy was that?

May the 4th be with you in your crafty sewing adventures this week and be careful with those light sabres!  😉

It’s been a better week; No more bad news at any rate!

Recent events mean that I’ve been put back a little bit with projects that I’ve been working on, so over the last couple of days I’ve had to get my head down and do some serious catching up.

And with the weather continuing to be fairly vile I’ve also decided that it’s probably not a good idea to take myself off somewhere in the camper van. So, for the moment, I’ve put my gastronomic travel plans on hold until the torrential rain decides to stop – apparently the weather forecast predicts at least another week before the sun puts in an appearance and we finally start to dry out! What a pain 😦

I have still been busy cooking up my own little storm though – so I thought I’d share some of my recent makes for this week’s blog….

Cute, crocheted, calorie-free cupcakes.

I’ve been making these delightful little treats for a while now – They’re very easy to make if you can crochet, and I like the fact that you can let your imagination run riot when it comes to the myriad ways of ‘decorating’ them.

Easier than it looks!

Here’s a very basic pattern to get you started (please note that it does not include details for creating the toppings, fluted edging etc):

Round 1: Use the magic ring method to form a loop, working 6 dc into the centre of the ring (6 sts). Join with a sl st to the first dc. Make 1 ch.

Round 2: 2 dc in every stitch (12 sts), join, 1 ch.

Round 3: (1 dc, 2dc in next st) six times (18 sts), join, 1 ch.

Round 4: (1 dc, 1 dc, 2 dc in next st) six times (24 sts), join, 1 ch.

Round 5: (1 dc, 1 dc, 1 dc, 2 dc in next st six times (30 sts), join, 1 ch.

Rounds 6-7: 1 dc in every st (30 sts), join, 1 c.

Round 8: (1 dc, 1 dc, 1 dc, 1 dc, 2 dc in next st) six times (36 sts), join, 1 ch.

Rounds 9-11: 1 dc in every st (36 sts), join with a sl st to first dc, 1 ch.

Round 12: (1 dc, 1 dc, 1 dc, 1 dc, dc2tog) six times (30 sts), join, 1 ch.

Round 13: 1 dc in every st (30 sts), join, 1 ch.

Round 14: (1 dc, 1 dc, 1 dc, dc2tog) six times (24 sts), join, 1 ch.

Round 15-18: 1 dc in every st (24 sts), join, 1 ch.

Round 19: Work in back loops only – (1 dc, 1 dc, dc2tog) six times (18 sts), join, 1 ch.

Before continuing, trim off and tie in any loose ends. Stuff with a BS standard toy filling.

Round 20: (1 dc, dc2tog) six times (12 sts), join, 1 ch.

Round 21: (dc 2tog) six times (6 sts), join, 1 ch.

Cut the yarn leaving a 15 cm tail and pull the end through the stitch on the hook. Pull tight to fasten off. Thread the yarn end through a darning needle and gather up the final six stitches to close up the hole. Weave in loose ends.

Add toppings, beads sequins etc as desired…….

The finished item looking good enough to eat – Perfect to offer to the Vicar when he next comes for tea 😉

They look great when arranged together on a vintage cake plate!

Crocheted cupcakes and knitted Battenburg – Yummy!

Next week sees the start of another month and a new theme – Sewing! I’ll be starting off with a simple, hand sewn item that you can use as either a keyring or bag charm. Until then, Happy Crafting!

April: Another month and time to change to the fourth theme of my ’52 Crafts in 52 Weeks’ odyssey: Home.

Fellow camper van owners around the world would possibly all agree that this can be wherever you park it – and there’s certainly nothing quite like embarking on a road trip when you’ve got all the comforts you’ll need to set up ‘house’ right there in the interior of the vehicle that’s getting you from A to B. It doesn’t even matter if your ride isn’t the fastest or prettiest on the highway when you rest safe in the knowledge that you can pull over at any time to make a cup of tea and rustle up a snack before setting off on your way again. And even better to know that once you arrive at your destination you can simply take the key out of the ignition, reach into your fridge and pull out a nice cold beer and relax without too much worry about setting up camp 😉
My bus - And home away from home 🙂

So this is the home I’ve chosen to conduct current proceedings from – My wonderful hi-top, T25 camper van, known to the world as ‘Vince’.  And my weekly craft feature will focus on making delicious things to eat wherever I choose to pull up and stop along the way. It’s also a great opportunity to share some of the beautiful places that are within easy reach of my more permanent bricks and mortar base and a brilliant excuse to pack up and go on a regular weekly road trip.

Parked up nice and early at Sandsend, North Yorkshire.

Earlier this week I took advantage of the gorgeous sunshine and record temperatures and made the journey to a beautiful coastal village in North Yorkshire called Sandsend. My driving companions consisted of two English Bull Terriers, and Mr Other Half.

Sandsend - Just down the road from Whitby, North Yorkshire

Sandsend is 92 miles and around two hours away from where we live and the journey there takes you through the breathtaking North York Moors National Park – Home of ‘Heartbeat’ and the fictitious Aidensfield. At one end of the bay, approximately two miles away, is historic Whitby – the legendary home of Bram Stoker’s ‘Dracula’, Captain Cook’s birthplace, a medieval Abbey and one of the best fish and chip restaurants in the country; at the other end of the bay is Sandsend, start of the Cleveland way coastal path and once the scene of a busy alum mining industry.

Old picture showing Sandsend at the height of the alum mining era.

On arriving, we put the kettle on to have a quick cuppa before setting off for a two hour walk along the cliff top to Sandsend Ness – a slightly incongruous lunar landscape attributable to the industry that once thrived there. The sun was beating down, the birds were singing and it was lovely to see signs of Spring bursting forth in all directions!

A cinder pathway leads along the top of the cliffs.

Heralds of Spring - English violets growing wild at the side of the pathway.

Sandsend Ness. The quarried spoil heaps look like some kind of lunar landscape - stunning against the backdrop of a blue sky and glittering sea.

Sandsend Ness was our final destination before turning round and heading back for lunch. It’s a slightly strange and eery spot, and a lasting legacy of our British industrial heritage. This barren and arid landscape can be attributed to one of the extraction processes of the once thriving alum industry – the shale burning ground. It’s an operation that’s been closed down for nigh on a century yet still nothing grows here!

View from Sandsend Ness looking further up the coast towards Kettleness

The walk back to the bus was equally breathtaking! We certainly worked up an appetite and a hefty thirst for a cup of tea in the process 😉

Whitby - As viewed from the clifftop path on the walk back.

We had to make lots of stops - It was such a hot day!

Back at base camp the two bullies of the bus flaked out whilst Mr Other Half took charge of preparing the vittles – I was supposed to be doing this, but in honesty he’s much better at making delicious stuff to eat, so I was relegated to making the tea whilst he whipped up lunch 🙂

Yup! The tea cozy now takes pride of place in the Bully Bus 🙂

And this is the essence of this week’s blog post really – making something that addresses the theme of ‘Home’. Courtesy of Mr Other Half.

Mr Other Half preparing lunch. It's a case of standing well back after lighting the blue touch paper!

He chose to make a hearty goats cheese and marmalade toasted sandwich – delicious!

Here’s what he did:

Cut a large bread roll in half and place crust side up under a hot grill – remove when toasted and spread a generous layer of marmalade on the untoasted side. Add a layer of finely sliced mushrooms and tomatoes and top with thick hunks of goats cheese. Add a few extra halves of tomato for garnish. Place back under the hot grill until the cheese begins to melt and bubble – leave it longer to brown on top if you prefer. Serve up with a light green salad dressed with lemon and olive oil. Very filling, extremely tasty and guranteed to set you up for the rest of the day!

Delicious! Mr Other Half's marmalade & goat's cheese toasted sarnie.

I guess some people would consider this a bit of a weird combination – but don’t knock it until you’ve tried it; it’s seriously good. And you could always substitute onion marmalade if you have a more savoury palate. Here’s a link to a really nice recipe that’ll keep for about 6 weeks in the refrigerator: http://www.rivercottage.net/recipes/caramalised-onion-marmalade/

Whether the idea of this appeals to you or not it must have at least smelled nice as we had a crowd of unexpected visitors for lunch!

We had guests over to dine in the form of a few inquisitive ducks.

Once our meal had settled and the teapot had been drained we went off for another walk – but this time along the beach. Fossil hunting, digging holes in the sand, lots more sunshine and a nice dip in the briny to round off the day 😉

First fossil find of the day - Crinoids!

The sea has sculpted these wooden groynes into some weird version of Stargazy Pie!

A late afternoon paddle in the briny was just the thing to cool down toasted tootsies.

The bullies of the bus! Absolutely shattered after a fun packed day and ready for the trip back to Leeds.

On the way back the bullies of the bus crashed out on comfy cushions at the rear and dreamed of sandcastles – Lovely!

It’s like they say though, home is DEFINITELY where you park it 😉

There’s something very soothing and lovely about a nice cup of tea; Particularly one that’s made using a teapot and some proper loose leaf as opposed to a couple of teabags.

A good cup of Rosey Lee is one of my vices, and whether I’m at home or on the road, a teapot is an absolute necessity; That, and an accompanying cozy of course – as it helps to keep the pot warm and prolongs the whole tea guzzling experience just that little bit longer 😉

I spotted this rather lovely example on the telly the other week……

How marvellous!

………And tracked it down as available to purchase from Debenhams; It looked like a must-have buy……….

However, on closer inspection I found that it’s part of a larger range of patriotic themed wares that go by the name of ‘Street Party’ and has been made to fit one particular teapot that’s shaped differently to mine. The label also reveals that it’s been made in China and imported in to the country – therefore not really flying the British flag and supporting the UK economy 😦 It was with a heavy heart that I kept my money in my pocket and walked away empty handed.

Never fear, thought I………I’ll make my own version – based on classic English design and using locally produced materials that boast bonafide British credentials.

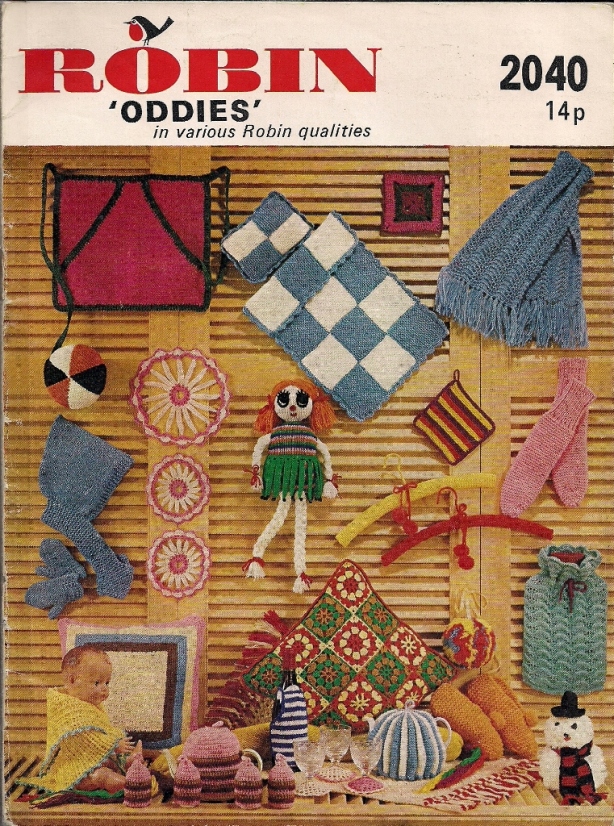
So I dug out an old crafting pamphlet that had been produced in the seventies by a local company just up the road from me called ‘Robin’s’ (based in Guiseley, Leeds) and also selected a few balls of DK weight acrylic yarn made by Woolcraft (spun by Yorkshire craftsmen based over the valley in nearby Bradford). Game on!

21 classic knitting and crochet patterns using odd ounces of wool

The pattern I chose produces a fairly easy and quick to make piece of crochet – it’s pictured at the bottom of the front cover in a striped pink colourway with four matching egg cozies. I adapted it slightly to suit my own tension and also to fit my teapot properly; And I made further changes by choosing to continue the striped pattern from beginning to end, using just double crochet stitches throughout as opposed to a mix of double and half double stitches as indicated in the original pattern.

Quick to make and an easy to follow pattern using single crochet stitches.

The adapted pattern is as follows:
STRIPED TEA COZY
Materials:
3 balls double knitting yarn in Red, White & Blue
3.75 mm crochet hook
Make two pieces:
With 3.75mm hook and Blue make 37 ch. Work 1 dc into 2nd ch from hook, 1 dc into each ch to end, turn with 1 ch.
Work in dc to end, turn, break the Blue and join in White, 1 ch then work in dc to end, turn with 1 ch.
Work in dc to end. Turn, break White join in Red, 1 ch then work in dc to end, turn with 1 ch.
Work in dc to end, turn, break Red and join Blue, 1 ch then work in dc to end, turn with 1 ch.
Continue with striped pattern to 5 ins from beg.
Next row, working in dc, and continuing with striped pattern, dec 7 sts evenly over the next and each of the following 3 alternate rows.
Work 1 row. Take 2tog to end of row, fasten off.
Join both pieces together leaving openings for the handle and spout.
Press lightly on wrong side using a warm iron over a damp cloth.
PLEASE NOTE that permission has been granted to share this pattern and no copyright has been breached.

A BBBB design originally intended for use with a bead loom but also works well for cross stitch.

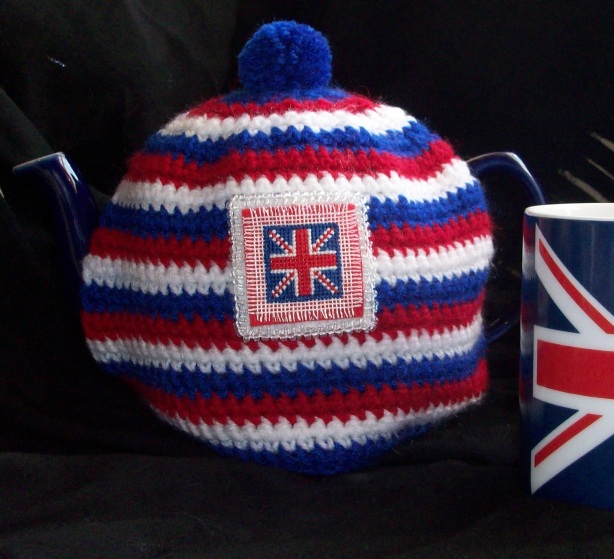
For a special finishing touch I used the Union Jack chart I published in ‘Adventures with an Indian Bead Loom‘ to create a small piece of cross stitch that I layered up with a few squares of felt and then hand stitched in place with a double edge of clear seed beads. And it’s all finished off with a coordinating pom pom (please see last week’s blog for instructions on how to make one).
I think it looks lovely! And a perfect fit for my teapot; a fine example of retro kitsch.
Must be time for a well deserved cuppa now…………
Next week sees my final delve into retro crafts before entering a new theme and a new month – time for a look at one more gadget methinks. Until then, Happy Crafting!

A mega quick offering this week I’m afraid, as things have got very busy again at Bully Bus HQ 😉

And this time I’m going to show you a quick way to make perfect pom poms with another gadget from my crafting arsenal. It beats cutting out little cardboard circles like folks used to do back in the Seventies and can also be very therapeutic!

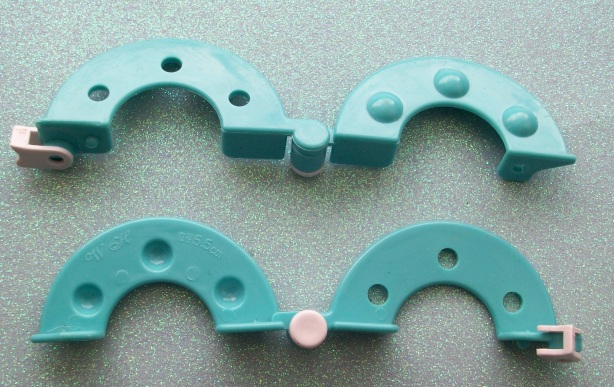
First you’ll need a pom-pom maker and some wool.

My pom-pom makers come in two identical hinged pieces – one half with holes and the other with knobbly bits. Line them up as shown with opposite sides facing each other.

Start wrapping the wool round.

Keep going until both sides are well wrapped.

Trim the end of wool to leave a short tail. Close the hinged pieces together and use the little white clips to fasten everything in place.

There’s a little ‘channel’ running between each half of the pom pom makers – Use this as a guideline for cutting through the wrapped wool.

Work all the way round. Cut a length of yarn to secure everything in place – use the cutting channel as a guideline again for where to bind and tie this.

Release the little white clips and ease the pom pom out by opening each hinged piece and removing.

Give the pom pom a little shake to help fluff it up. You may find that there are a few uneven ends – You’ll need some sharp scissors to give it a little haircut and even it up if it needs it 😉

My pom pom still needs a bit of trimming to make it perfectly spherical – then I need to make a further eight exactly the same, plus one that’s slightly larger.

Why? You may ask. Well, this month’s theme is all about retro crafts and I did say at the beginning that I wanted to make something nice for my home and something equally stunning for my camper van. So…….. a crocheted loom flower throw for the bus (which I’m tackling as and when I get any spare time), and something stunning from my little ‘Bazaar Time’ booklet (circa 1960’s) for my home.

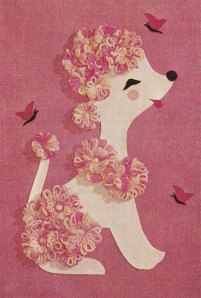
Something stunning with pom-poms? Take a closer look at the cover and you’ll see it 🙂

No?

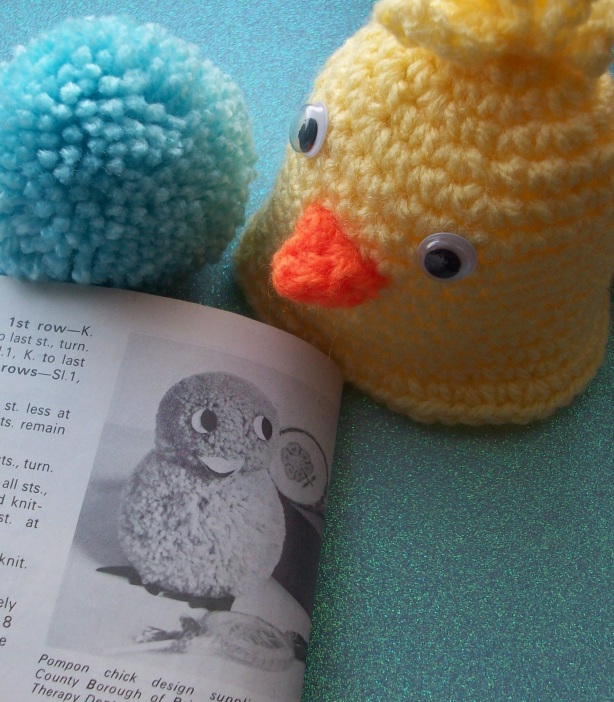
A pom-pom poodle toilet roll cover! The epitomy of retro style and taste; I’m going to have the best looking bathroom in the UK when it’s finished! Now it’s just a matter of finding the time to get it done as I’m currently busy crocheting chicken egg cozies and amigurumi bunnies for Easter. Maybe I should have plumped for the pom-pom chicken design that’s also featured in my ancient crafting booklet instead ……. a cool idea for something to do with the kids methinks. Oh well………Happy Crafting!

Continuing with my retro crafts theme, this week I thought I’d introduce you to a few more cool crafting gizmos and show you how to make quick and easy Suffolk puffs.

Classic Puff Patchwork Cushion

Sometimes referred to as ‘yo-yos’, a Suffolk puff is a little gathered circle made from a scrap of fabric and as such can be a brilliant stash buster when you need to use up excess resources. Traditionally, they were used in patchwork and quilting where they were joined together, edge to edge, and were incredibly popular in the thirties, forties and fifties, when out of thrift and the necessity brought about by hard times, people would use up every last scrap of fabric and recycle all their clothing in the ‘make do and mend’ culture.

Patchwork and puff perfection.

These days, with a resurgence in the popularity of all things patchwork, Suffolk puffs are once again in vogue and are often used  as embellishments, but also feature strongly as decorative elements in homewares, soft furnishings and even clothing.

Bjork sporting a coat made entirely of Suffolk Puffs.

They’re incredibly easy to make – particularly with a yo-yo maker or two to hand, and are also fairly portable which is why I often end up taking a stash of fabric circles, needle and thread on the road with me during the summer.

This week’s collection of gizmos and gadgets.

So let’s get down to the knitty gritty of how to make some…

We’ll start by using a couple of yo-yo makers which are basically circular discs with sewing guidelines. I’m using two different sizes with diameters of 45 and 60 millimetres and my fabric of choice is a selection of lightweight cottons.

7. Repeat the whole process again, using contrasting fabric and a smaller yo-yo maker.

Now it’s time to make a covered button before finally assembling each element.

9. Stack the two puffs and use a few stitches to join them together; add the fabric covered button as a finishing touch before stitching on a brooch back and Voila! A lovely brooch that would make a pretty gift for Mother’s Day 🙂

A really pretty, hand crafted gift for Mum!

Suffolk Puffs are great to use as embellishments. Why not invest in a couple of yo-yo makers and have a go at making some yourself? You’ll soon become hooked!

Puffs a’plenty on bags and purses – great little gifts to give to family and friends 😉

If you want to join in with my crafting adventures next week it might be wise to start sorting through your wool stash now. Until then, Happy Crafting!

It’s March! A new month and a new theme; Retro crafts will be my focus for the next few weeks where I’ll hopefully introduce a few cool gizmos that’ll make your crafting life much easier as well as creating at least one really nice accessory for my camper van and the odd, gorgeous household item in the process!

Let’s kick the proceedings off with something steeped in 70’s nostalgia – Flower Looms.

All the rage in 1974!

For the best dressed gal in town – A Flower Loom Stole

How positively delightful! Floral, feminine and flouncy – I’m sure you’ve probably come up with a few f-words yourself already 😉 Let’s look at a few more examples and really get to grips with this whole flower thing……

This screams out to be made and take pride of place in my house somewhere.

I’m taking bets that something like this ends up in Kath Kidston!

I could actually see this sort of thing coming back in a big way in 2012! I feel a summer collection coming on…!

RONCO – Bringing gizmos and gadgets to the crafting world. May the Lord bless ’em and keep ’em safe!

Right! That’s enough of that – Here’s a tutorial…..

First of all you’ll need a flower loom; I’m using one with movable pegs as my weapon of choice where different configurations will yield different styles and sizes of flowers.

Loom with movable pegs – Set up in a kind of Stonehenge configuration.

Look closely and you’ll see that it’s numbered at the edge – This shows you where to start and which direction to take.

Now are you ready?

1. Take a ball of DK weight yarn in the colour of your choice and grip the end firmly between your fingers. Pull the yarn out to arms length, and measure a tail that reaches from your extended arm to your nose. It’s important to remember to do this – Your going to use this ‘tail’ to secure everything in place when we reach stage 4.

2. Starting at the peg nearest position one of the outer edge of the loom, wrap the yarn in a figure of eight loop between this and the corresponding outer edge peg on the other side. Do this about four times before moving on to the next set of pegs, repeating the process all the way round until you arrive back at the beginning.

So far, so good? Here’s a tip – Once you’ve started wrapping your yarn, pull that long tail through to the other side of the loom so that it doesn’t get in the way

3. Using a second ball of DK yarn in a contrasting colour, virtually the same process is repeated all over again with the inner ring of pegs. Please note that you don’t have to measure out an arm to nose length of yarn in this step – 6 inches of excess yarn is ample at this stage.

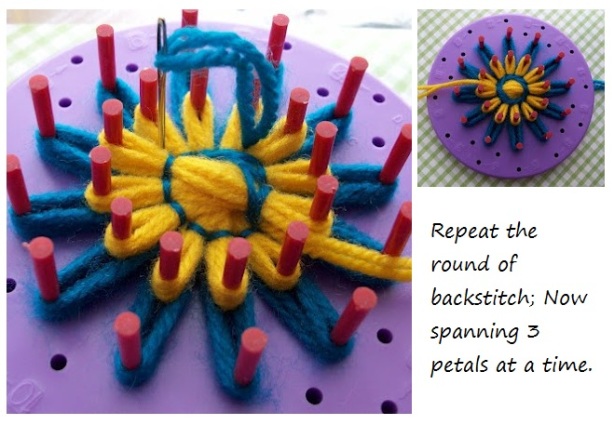
4. Now we’re going to secure everything in place. Thread the end of your tail of yarn through a nice big darning needle. Starting at peg one, bring the needle through from the back of the loom and in between the outer ‘petals’ of your flower and stitch in to the centre. Following the direction of the arrows, use a simple backstitch to secure all the wrapped yarn in to place.

5. Bringing the yarn through from the back of your work again we’re going to work one more round of stitches to make everything look pretty. But still using a backstitch, we’ll work over a span of three petals each time until we get back to the beginning.

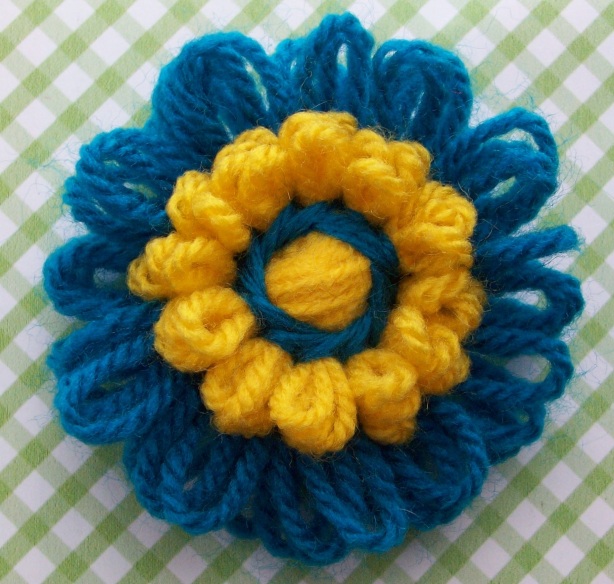
6. The flower is pretty much complete – Just remove the pegs to release it from the loom.

7. Give your flower a little ‘fluff’ to release the petals. Thread any loose tails of yarn through to the back of your work and secure. Bury any ends in the centre of your flower.

All done and dusted – Now I just need to make a small mountain of these to join together for my latest bed throw in the camper van!

Ain’t they lovely!

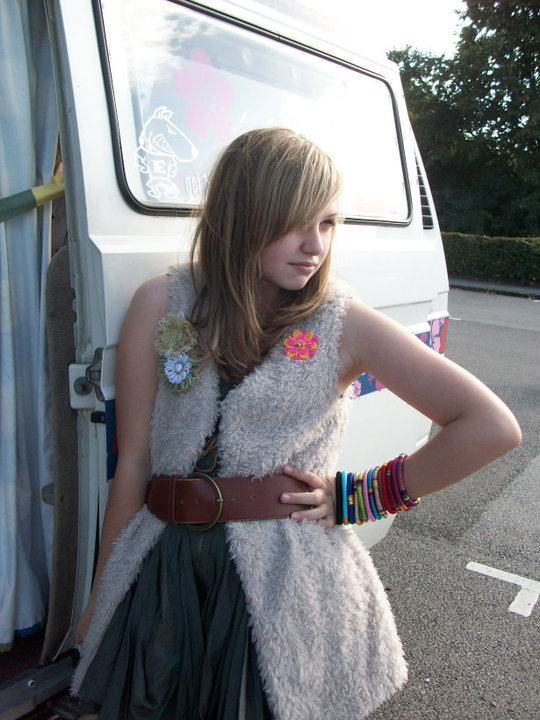
I’ve usually made them into quick brooches; Here’s one of my lovely nieces modelling a few from late 2010:

Poor Sash! Dragged all over the place to model for the Big Blue Bully Bus – This time it was just down the road from me at Kirkstall Abbey, Leeds. She’s a trooper, bless ‘er!

But this time, I’m going to make a huge stack of them to turn into a new bedspread for the bus! All thanks to the lovely lady behind knitting-and.com – http://www.knitting-and.com/small-looms/index.html and the oodles of hints, tips and inspirations she’s gathered together. She lives around and about the environs of Wollongong, Australia – possibly just round the corner from my lovely sister in law and her husband who love our Dak Dak (1963 splitty) to bits. Please take a few moments to visit her website if you can – it’s just brilliant!

Next week I’ll be introducing another gizmo that I think every crafter should have in their arsenal and also hopefully be giving you an idea for an ultra quick and easy to make Mother’s Day present – You’ll need a needle and thread and some scraps of fabric…… amongst other things. I’ll say no more,  I’m planning a trip out with the dogs and Mr Other Half in the bus before I spill the beans……. until then, Happy Crafting!

The world and his wife seem to be going crazy for Shamballa bracelets; I kind of don’t get it. But, I do get loads of people asking me if I can make them, to which the answer is usually……, NO!

Shamballa Bracelet by naturalhandmadejewellery.com

This week, due to the high number of requests that seemingly will not cease, and the fact that it’s coming up to festival season where they’ll probably fit in quite nicely with everything else I stock on the trade stand, I have finally decided to bow to the pressure and make macrame bead bracelets the subject of my crafting adventures.

First, to understand why people are going crazy for them….

Shops don't sell bracelets; Rapper's do!

Shamballa is apparently some hidden kingdom that’s been mentioned in lots of ancient Buddhist texts; It’s a place of peace, tranquility and happiness. Shamballa is also one of the bodie’s chakras and is located in the heart of all living beings. Apparently, the current craze for Shamballa bracelets and necklaces was brought about by the fact that assorted rap and hip hop artists have taken to wearing them because of their deep and hidden meanings and healing properties. This, in turn, has resulted in assorted celebrity names also jumping on the bandwagon; The likes of Jay Z & Beyonce, Michael Jordan and Heidi Klum have all been spotted sporting their Shamballa goodies and their fans have followed the ‘trend’. It’s pretty much like going back to the eighties with the Beastie Boys and everyone stealing VW badges all over again! Now that I can understand……… 😉

Shamballa - The symbol of peace, tranquility and happiness - Gulp! ;0)

Here’s a great tutorial that shows you how to make a macrame bead bracelet for yourself:

http://www.shamballas.com/how-to-make-a-shamballa-bracelet/54

Half way there - About 15 mins work.

And here’s mine using waxed cord and metallic effect berry beads.

Macrame Berry Bead Bracelet by The Big Blue Bully Bus

Dead easy to make and very quick to complete! Why not have a go for yourself and join in with the crafting fun?

Next week sees the final part of my adventures in jewellery making – with me getting all excited by Indian bead loom bracelets and beyond. Until then, Happy crafting!

Wow! It’s already February and this week see’s the move into the second month’s theme of  ‘Jewellery’. And a very busy start to the month at Bully Bus HQ it has been what with early Spring cleaning and all; I was fearful that at one point I might not be able to squeeze this week’s offering in at all, but here it is – my adventures in beaded felt jewellery….

I love playing with embroidery silks and beads!

First of all, I have to say that I LOVE making little felt beads! The resulting treasures look great when incorporated into jewellery designs and are always a really big talking point when people spot me wearing them. They’re incredibly easy to make and there’s also a brilliant little book bursting with all the inspiration and instructions you’ll need to get producing them for yourself.

Beaded Felt Jewellery – Helen Birmingham

If  you haven’t got a copy of this inexpensive little book, and you feel after reading this blog that you’d like to include beaded felt jewellery in your own crafting repetoire, I would highly recommend popping along to your local bookshop, craft store or online at Amazon and make sure that you pick one up – ISBN-13: 978-1844483150.

Make sure you gather everything you need!

So…….. How to make some felt beads of your own. Hopefully you’ve gathered together some scraps of felt (the thin crafting type is easier to work with), some embroidery silks (although normal sewing thread is fine), a selection of seed and bugle beads, a sewing needle, some scissors and a bamboo skewer – make sure that you either cut the sharp end off, or cover it with a blob of  Blutack or piece of cork though; From painful experience I can’t tell you the number of times I’ve impaled myself with the air turning blue as a result 😉

Step 1: Cut yourself some strips of felt roughly 2.5 cms wide by about 8 cms long. Select some thread to match the colour of your felt – it doesn’t matter too much if it’s not exact.

Step 2: Take the bamboo skewer and wrap the felt strip tightly around it. Use a few stitches to secure the edges in place. I’ve used a contrasting colour to demonstrate – And don’t worry about being too precious at this stage as you won’t actually see this join when you’ve finished.

Wrap tightly then stitch to secure.

Step 3: This is where the fun begins! Choose some contrasting thread and using your needle, sew into the felt tube at one end to secure in place. Carefully wrap around the tube with the thread, making sure that both ends are tightly bound – otherwise the ends will flare out over time and the beads may look mis-shapen. Finish off with a little knot and bury this, along with the tail of you thread, inside the bead.

Bind well at each end to stop ‘flaring’.

Step 4: Securing fresh thread in your felt tube bead (back to the same colour you used in Step 1) you can now add your embellishments. I tend to start at one end and work randomly, stitching through from one side to the other each time to secure your seed or bugle beads in place. This will add strength to the structure of your bead and ensures maximum life expectancy when incorporated into jewellery pieces that are sure to be worn again, and again, and again….

To make life easy I’ve used size 8/0 beads; Size 11/0 will require more patience as not all will slip over the eye of the needle!

I like to add the beads in a random pattern – but neat freaks may differ in approach 😉

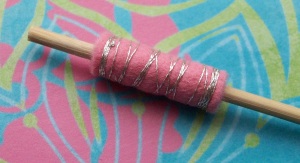
Step 5: Believe it or not that’s pretty much it! Repeat each step until you’ve got yourself a nice little selection of beads which you can then use in your own jewellery making projects. I tend to keep the beads on the skewer until I’m ready to use them and you’ll find that you can easily fit about six or seven beads to a skewer – just the right number to use for a bracelet!

So easy! And gorgeous when incorporated into your own designs 🙂

Yay! The finished product; Very nice – even if I do say so myself 😉

Next week I’m going to be having a go at more bead making – but this time with Polymer Clay. Wish me luck!

The VW show season has officially started with Campermart last weekend! Bit early in the year for me to be bothering, and to be fair I don’t know of a single soul that actually went, but I’m sure it was very lovely for those who did attend 🙂 Fingers crossed that it wasn’t a case of more traders than customers at any rate!

Today I received flyers for my absolute fave show – Volkspower at Redcar. If you haven’t been before – WHY NOT ?????? You can’t possibly imagine what you’re missing. Time to get your diaries out and pencil in the date, set up a little savings tin for petrol money, the bar and some fish and chips and start polishing your dancing shoes for the cracking entertainment on offer – I defy anyone to tell me that there’s better at ANY other show in the UK!

Paul and Mandy, the organisers, work so incredibly hard to bring us an outstanding weekend – And it’s northern and fairly local(ish) which is also an added bonus. Even if it was at the other end of the country I would make the effort to attend though; I’ve been there since day 1 and will forever sing it’s praises 🙂

Volkspower – Be There or Be Fed Up You Missed It!

Ooooooh! And did I mention that it’s by the sea and quite a good surf spot too? Just a five minute walk to the beach with your wetsuit or a quick drive along the coast road to the local Saltburn scene. How cool is that?

I’m off to start shining my dancing shoes NOW! It’s time to come out and PLAY!